Showing posts with label seed starting. Show all posts

Wednesday, June 5, 2013

Make Your Own Mini Greenhouse

Prepping the soil in the greenhouse.
Photo courtesy of ecotwaza.com
Back in the wilds of April I planted a few seeds. This is not particularly remarkable given the time of year and my interest in all things growing. What was remarkable was that I planted them in an egg carton that I then placed inside a plastic bag that I then set in our sunny bedroom window. Then the things that shocks me every single time occurred: the seeds sprouted. They since turned into seedlings that have since been planted on our balcony for transformation into this years green curtain.

The egg carton greenhouse has also undergone something of a transformation. While cardboard is the preferred container for its biodegradability, I recently learned the merits of plastic. (I won't advocate the use of plastic specifically, but I will advocate the use of what you have on hand.) At a recent workshop I gave at an Eco Fair in Tokyo plastic is what I had. The many smiling faces should be evidence enough that it worked well.

We also wrote up the technique at ecotwaza so folks could try it at home for themselves. I'm hopeful to hear of other variations on the theme, too. And eager to hear stories of sprouting plants all over the city cared for by a fresh round of new farmers.

Monday, April 15, 2013

Living Mulch for Containers

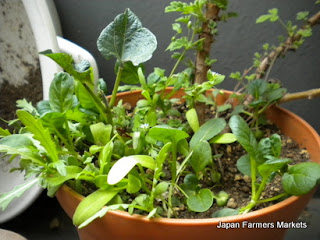
The little riot of green, a.k.a. living mulch, in one of my pots on the balcony.
The same inspiration - spring, packets of seeds for sale everywhere, and the current flow of work at the farm here in Tokyo - that 
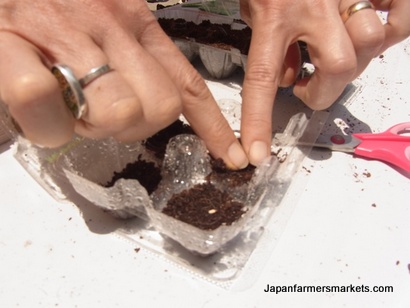
led me to see my egg carton in a new way, led me to read this article by Ari LeVaux in a different light. LeVaux wrote about a beautifully simple idea she had for old seeds: mix them together, spread them on the garden bed in fall, rake them in, and then as they sprout in spring and the rest of the seasons eat them as you need room for new plants. Brilliant. And exactly the kind of thing I've been wanting to hear.

At our farm the standard practice is to use a black plastic mulch that gets laid down by a heavy machine. It works well as a means to heat up the soil in cooler weather, keep down weeds, and retain moisture. But its plastic, requires fuel to be made and applied, and gets trashed at the end of the season. My farmers put it down for me each season after they till in whatever organic stuff I've spread on the soil. I see the appeal, but this year I'm opting out. The farm has grown and my farmers are crazy busy. The plastic and the fuel to make it and lay it out are expensive, and I don't want to cause them undue expense. They would never complain or deny it to me, but I still worry about it. And it's time to find an alternative.

These past years I've also done a fair bit of book reviewing for Permaculture Magazine and reading on my own about farming and gardening. The consistent message is that soil does best when left to its own devices. If I don't till, then the matrix that lives there only gets stronger and healthier. This in turn gives me healthier vegetables, herbs, and flowers, which makes them less susceptible to pests and disease. If I feed this matrix periodically with things like urine, leaves, straw, and my very own compost, it builds up, literally and figuratively, even more. (My garden beds where I've put some of these techniques into practice sit a full ten inches higher than the surrounding land.) If I grow a diversity of plants rather than a monoculture, this gives them an even further boost as pollinators and predators have a place to live and eat while pests and disease have less of an opportunity to settle in and wipe out a crop.

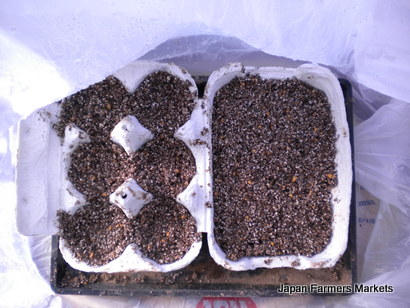
Ok, there's the philosophy. I dug out my old seeds and dumped them all in a jar, per LeVaux's advice. It's not fall, but who cares? They're seeds. I'm a farmer-type. There's open dirt in my garden. I set it next to my compost bucket headed to the farm the next day.

Then I set about repotting a few balcony plants. I'm scaling back pretty severely this year as we will be moving in March, but there are a few old friends and favorites I'm keeping around. As I filled the pots and gently patted down the fresh dirt, the seed jar caught my eye. "Open dirt," my farmer-self thought. Why not?

I opened the jar, sprinkled a handful of seeds over the surface of the soil in the pot, covered it over with a layer of dirt, and gave everybody a drink of water. Experiment underway.

Flash forward three weeks. The seeds have sprouted in a little riot of green that fills my heart with pleasure. Shungiku, scarlet runner beans, daizu, beets, and komatsuna are just a few of the things reaching for the sun at the moment. I'm not sure yet if it's the cosmos or the dill seeds that have sprouted, so I'll have to wait to report on that. Meanwhile, my mouth is watering.

How this will exactly play out once I start eating I don't know. Will I scatter more seeds? Will I just leave it be? How big will I let the seedlings get? Excellent questions all.

My advice so far, though, is to do it. Seriously, why not? For those that don't have a garden, this is a nice solution for old seeds and pots that dry out quickly. Mix in some legumes, i.e. peas, beans, daizu, sweet peas, etc., that will offer up some nitrogen to the soil and their companion plants. Herbs, greens, vegetables, and flowers are all fine. The worst that happens is you get a riot of green and color that could be mostly edible. (Don't eat the sweet peas, please.) Mulch away!


Monday, April 8, 2013

Egg Carton Greenhouse

Egg carton garden in it's homemade greenhouse.
Please excuse the free advertising for my hometown grocery store.
Spring, of course, is when everyone's mind turns to seeds and new green things. I am no exception, especially as we are busily planting things almost every day at the farm or tending to things that will be planted shortly. As usual, I decided to start some seeds of my own at home. I'm thinking of a green curtain, of course, for the summer, and this year I'm going with morning glories. I love them, and their blue trumpets and generous heart-shaped leaves make ideal shade long into September when the sun still manages to beat down on our little apartment.

So, I made my own little greenhouse. Inspired by Cardboard Collective's numerous ingenious ideas and an aversion to plastic, I turned an egg carton into a planter and an old grocery bag into a greenhouse. So far so good, and it was easy to boot!

What you'll need:

  • seeds
  • cardboard egg carton
  • seed starting soil (preferably. It tends to be light enough and often comes a bit pre-loaded with what seeds need to sprout.)
  • a large-ish container
  • shishkabob sticks, about eight
  • a plastic grocery bag
  • a small waterproof tray
  • a clothespin
  • a sunny window

Dampen the seed starting mix.
Plop some of the mix in a bowl or container and add some water. You're aiming for a damp texture, but not absolutely dripping. Dampening it first means you don't have to water once the seeds are planted, which can wash the seeds about and out of place. Especially if you're me and you don't have a watering can of any kind at home. Keep mixing until the soil sticks together in your hand.

Egg carton garden ready to grow!
Fill the egg carton seed starting tray.
I filled both sides of the carton. The side where the eggs sit is nearly made for seed-starting, and the other side when laid open flat looks like a miniature garden. Leave a centimeter (give or take) of space between the top of the soil and the rim of the carton. You want this to be well-filled, but don't press it in too firmly. Seeds and roots need a bit of elbow room to grow and breathe, and a tightly packed soil doesn't give them any space for either of those things.

Plant your seeds.
I planted watermelon on the left side where the eggs sit as I had some leftover seeds from last year. (Sadly, these didn't sprout. A fresh egg carton is underway even as I type.) On the right I sprinkled morning glory seeds. I covered them with a thin layer of the seed starting mix and pressed it down firmly but gently over them. (The rough guide here to covering seeds is to bury them only about as deep as they are thick.) The seed needs good firm contact with the soil in order to sprout, but it can't be so tightly packed that the sprout can't push up to the light and the roots push down into the soil.

Set up the greenhouse.

  • Place the egg carton on a tray (or other object) that fits squarely inside the bottom of the plastic grocery bag. The cardboard does get a bit soggy-saggy almost immediately, so having a tray of some kind or another keeps things under control.)
  • Insert tray and carton inside the plastic bag. Check that it fits well enough that you can pull up the sides of the plastic bag easily and close it.
  • Insert shishkabob sticks in the four outer corners and the four inner corners of the egg carton tray. Water will condense inside the bag as the interior heats up. This in turn will make the walls heavy. The sticks are just enough to help keep the plastic bag above the seedlings once they've sprouted. Not keeping them off the seedlings crushes them, but also makes a nice environment for molds and fungus that are not helpful in this situation.
  • Lift the sides of the bag up and tie the handles together with a clothes pin. This helps the interior temperature of the greenhouse rise, which is what will encourage the seedlings to sprout. Periodic opening helps satisfy your curiosity, but can also keep a bit of air flowing, which helps prevent those molds and fungus' from growing, too. Be careful, though, as too much peeking will lower the temperature and result in slower sprouting or no sprouting. 
  • Set it in a sunny window and wait for your new friends to appear!

Friday, April 1, 2011

Better Late than Never: Seeds Potted Up!

Our month in America followed in short order by a strained Achilles and Soleus muscle, the earthquake, and a trip to Osaka, means I've gotten a bit behind on garden work both at the farm and on our balconies. While I've managed to get a bit of tidying done at the farm garden, there's still plenty to do:
  • a yuzu tree that is looking to move to a larger pot with some spruced up soil
  • empty window boxes that need to be prepped with green curtain fixings
  • seeds that need to be started for the garden as well as the green curtain
  • garden diagrams to be drawn up with a list of crops for this year (need to reference garden journal to make sure I get the rotation right)
  • a compost bin to build so I can...
  • turn over the compost in the bin
Sunday's task, though, was to get some seeds started. Potted up and sun-bathing in our bay window even as I type are pots of cardinal climber, calendula, and Brandywine tomatoes. Next up will be some chili seeds my gardening partner from Singapore likes, cilantro, morning glories, cucumbers, and zucchini. And maybe one or two more. Once I get going, it's hard to stop.

Wednesday, December 29, 2010

Green Tea Seed Research

November found me visiting one of the many Tokyo farmer's markets to see what seasonal offerings were available. While visiting the Ebisu Farmers Market in November I met Noriko and Unikyo Sakyoen of Sakyoen Teas. They, of course, were selling their tea, but what drew me to their booth was the little box of brown balls pictured at left. Thinking with my sweet tooth, I assumed these were some kind of Japanese sweet I'd not met yet. Also thinking they were free samples, I jetted directly over.

These are not something to be nibbled with tea, but they are tea itself. Green tea seedpods, to be exact. Rough to the touch and nearly light as a feather, they rattled a bit as I rolled them about in my hand. Sankyoen-san patiently explained to me in the simplest Japanese he could muster what they were and how to plant them. They have since sat in a small bowl on my bookcase waiting for me to make my move.

While Sankyoen-san's advice is certainly sound (as the twelfth generation of his family to grow tea, I assume his knowledge is near encyclopedic), I also did a bit of research on my own to find more details than my limited language skills and his busy market table would allow. The general consensus seems to be that the seeds need to be kept moist and planted fairly quickly in order to remain viable. (Mine have not had the advantage of either of these things, so I'm a little concerned.) Some sources recommend scarification of the seeds, and other simply recommend soaking until the seeds crack. If the seeds float, they are not viable at all and should be composted. (Mine are floating just now, but I'm hopeful they'll sink. If that means they are still viable, I don't know.)

Despite learning yesterday that my hopes of home tea growing are sunk (the seed pods did not sink or crack or anything), I did manage to find the following links that were incredibly useful for growing from seed or cuttings.

Easily the best resource comes from The Field Alliance (formerly known as the Community IPM Programme), an organization working to keep farming a viable economic alternative in rural communities in Southeast Asia. Their Tea Eco-Guide gives detailed information on growing from seeds or cuttings as well as soil preparation. Arguably, it is more than the home patio grower needs, but it makes good reading and satisfied my desire for solid information.

The University of Florida Extension Service offered good information for the home grower as did Narien Tea Store. (I don't usually reference company sites, but their information about growing was some of the best I found.)

Wednesday, April 14, 2010

Zucchini Seedlings Going Strong

These little guys just got rolling, and are enjoying the view from our windowsill for the moment. (Still a bit too chilly here to let them roam free in the garden.) It's a new variety - white patty pan - that I've never tried to grow or eat before, but I thought the farmers would get a kick out of them. I keep thinking they'll be awesome in a pesto-zucchini soup that I don't have the recipe for any more.

(Kale and Brandywine seedlings underway, too, by the way.)

Sunday, March 22, 2009

Seedlings in the Window

I started some of our first seedlings this past Friday using old sushi containers from a take-out meal earlier in the week. The containers are plastic with lids that fold or swing back making them nearly perfect for starting seeds. 


One container holds some Green Zebra seeds from Project Grow's awesome heirloom seed collection that I bought at the People's Food Coop. (Just so folks know, I blog for Project Grow and I served on the Board at PFC.) I first ate these tasty tomatoes last summer while working at Frog Holler Farm. I'd never seen a green tomato before, much less tasted one. I don't even remember exactly why I dug into one at long last, but I'm sure glad I did! The lemony taste and cute size of these little gems makes them one of the best tomatoes I've ever had. (It is hard to top a Brandywine, too, but I tend to eat those like my Wisconsin people. I cut it into thick slices with a sprinkle of sugar on top, and then eat it like I would a juicy steak.)


The other container holds some sweet basil seeds that our apartment's former residents left behind for us. I've got my fingers crossed that these sprout and do well. I've had mixed luck with seeds in the past, and so I'm hopeful but a wee bit sceptical, too. Luckily, I've seen basil seedlings at the local nursery as well as at another garden store at Kichijoji. There will be pesto! (Once we give in to the super pricey olive oil prices, that is, and walnuts. Yikes!)

I'm hoping to start some other seeds today or tomorrow of bok choi, peas, and cardinal climber. I The last two I imagine on trellis' climbing around our balcony. I've got a couple moshi containers from yesterday (more on that later) that should be good for those.